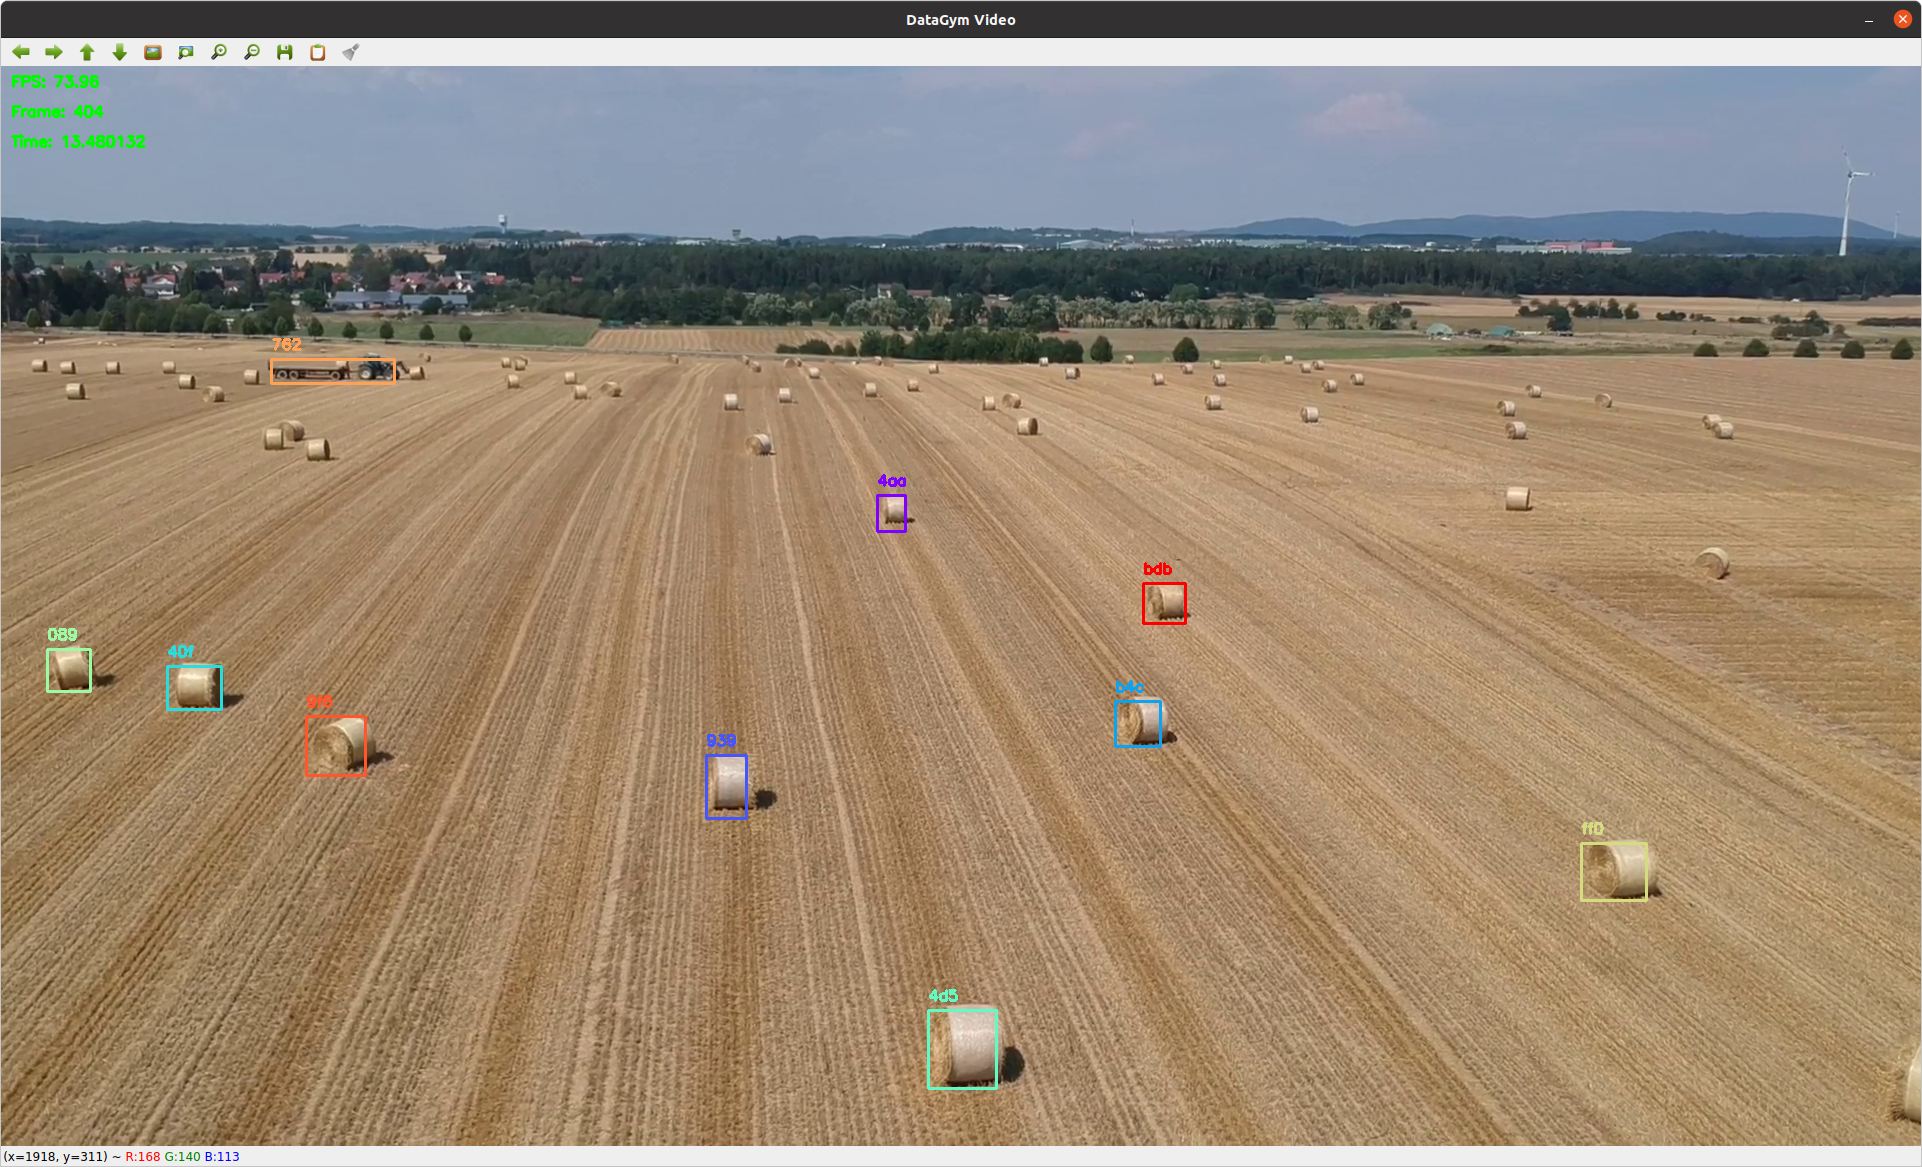
OpenCV Video Player
In one of our latest blog posts we introduced video labeling feature. This article introduces our new video features within our Python API. We implemented export labels functionality to export the whole project as well as a specific project that you want to export. Also, users can now download the videos by using our Python API. The code samples in this guide are also available as a Jupyter Notebook on GitHub.
Check it out and register your DATAGYM account here – it’s free!
from datagym import Client

client = Client(api_key="<API_KEY>")

project = client.get_project_by_name("Video_Project")

print(project)
output:
Project:           Video_Project
Project_id:        42a564aa-0bbb-4a9e-b780-e2a973a7c507
Description:       Dummy video project for video labeling
Media Type:        VIDEO
Datasets:          1
----------------------------------------

    Dataset:           Video_Dataset
    Dataset_id:        dc89057e-650e-4ed6-af4a-cd19c6055cca
    Description:       Drone footage of harvesting day
    Media Type:        VIDEO
    Videos:            5
Exporting the Labels
We can export all the labels that belongs to a project. Currently we have 5 videos in our video project. You can export them all by using our client and we can see that all of them are completed.
exported_labels = client.export_labels(project.id)

print("Label classes:")
for classes in exported_labels[0]['label_classes']:
    print(classes)

print("Tasks:")
for task in exported_labels[1:]:
    print(f'{task["external_media_ID"]:<25}t{task["status"]}')
output:
Label classes:
{'class_name': 'hay', 'geometry_type': 'rectangle'}
{'class_name': 'other', 'geometry_type': 'rectangle'}
{'class_name': 'object_name', 'classification_type': 'freetext'}
Tasks:
1618923766721_Hay2.mp4   	completed
  frames                 	246
  objects                	2
1618926555949_HayDay.mp4 	completed
  frames                 	955
  objects                	10
1618923764297_Hay1.mp4   	completed
  frames                 	266
  objects                	2
1618926554122_Harvester.mp4	completed
  frames                 	351
  objects                	2
1618923760729_Hay0.mp4   	completed
  frames                 	270
  objects                	2
We can also iterate through the videos and export them as we need. In this example we will use the video named “HayDay”, so exporting single video labels is enough.
def get_video_and_labels_with_videoname(video_name):
    if project.media_type == "VIDEO":
        for media in project.datasets[0].images:
            if video_name in media.video_name:
                _exported_labels = client.export_single_video_labels(project.id, media.id)
                return media, _exported_labels

video, exported_labels = get_video_and_labels_with_videoname("HayDay")

data_frames = exported_labels['labels']['frames']
data_objects = exported_labels['labels']['object']
Downloading the Video
We can now download the video, if we didn’t already. In order to download videos you need to set a destination folder. In the example bellow we used “videos” folder.
from pathlib import Path

videos_folder = 'videos'
path_dir = Path(videos_folder)
video_path = path_dir.joinpath(video.video_name)

if not video_path.is_file():
    client.download_video(video, videos_folder)
    print("Video Downloaded.")
else:
    print("Video already exists.")
Setting up the Data
Now that we have both our video and labels, we can now start using our data.
First, we need to apply linear interpolation to each object. This will fill the gaps between the keyframes. To learn more about linear interpolation you can read our blog post.
def linear_interpolator(visible_object):
    visible_object = {int(k):v for k,v in visible_object.items()}
    keyframes = sorted(list(visible_object.keys()))

    interpolatedVisibleObject = dict()
    previous_keyframe = min(keyframes)

    for i in range(min(keyframes),max(keyframes)+1):
        if i in keyframes:
            interpolatedVisibleObject[i] = visible_object[i]
            previous_keyframe = i
            keyframes.remove(i)
        else:
            next_keyframe = keyframes[0]

            dist_between_keyframes = next_keyframe - previous_keyframe
            dist_to_previous_keyframe = i - previous_keyframe

            fraction = dist_to_previous_keyframe/dist_between_keyframes

            previous_object = visible_object[previous_keyframe]['rectangle'][0]
            next_object = visible_object[next_keyframe]['rectangle'][0]

            interpolated_object = {'rectangle':
                                   [{
                                       'w' : int(previous_object['w'] + (next_object['w']-previous_object['w']) * fraction),
                                       'h' : int(previous_object['h'] + (next_object['h']-previous_object['h']) * fraction),
                                       'x' : int(previous_object['x'] + (next_object['x']-previous_object['x']) * fraction),
                                       'y' : int(previous_object['y'] + (next_object['y']-previous_object['y']) * fraction)
                                   }]
                                  }
            interpolatedVisibleObject[i] = interpolated_object

    return interpolatedVisibleObject

for visibleObject in data_objects:
    data_objects[visibleObject] = linear_interpolator(data_objects[visibleObject])
Also, in order to use unique color for each object we can create a color map.
import numpy as np
from matplotlib import cm
%matplotlib notebook

class ColorMap:

    def __init__(self, visible_object_classes):
        self.classes = visible_object_classes
        self.evenly_spaced_interval = np.linspace(0, 1, len(self.classes))
        self.colors = [cm.rainbow(x) for x in self.evenly_spaced_interval]
        self.create_color_map()

    def create_color_map(self):
        self.color_map = dict()
        for idx, val in enumerate(self.classes):
            color = [int(255*item) for item in self.colors[idx]][:3][::-1]
            self.color_map[val] = color

    def get_color(self, visible_object_clss):
        return self.color_map[visible_object_clss]

colormap = ColorMap(list(data_objects.keys()))
Displaying the Video with the Labels
Now that we completed our setup, we can start displaying our data. First, set up cv2 video capture, and some properties that we will use later.
import cv2
import time

cap = cv2.VideoCapture(str(video_path))

window_name = "DataGym Video"
cv2.namedWindow(window_name)

# Video information
video_fps = cap.get(cv2.CAP_PROP_FPS)
width  = cap.get(cv2.CAP_PROP_FRAME_WIDTH)
height = cap.get(cv2.CAP_PROP_FRAME_HEIGHT)
no_of_frames = cap.get(cv2.CAP_PROP_FRAME_COUNT)
font = cv2.FONT_HERSHEY_SIMPLEX
We can also add key presses and mouse clicks. In our example we used keys to control the video and mouse clicks to display information.
We set up functions to pause, go back and forth. **params is used to pass parameters to key actions. Then by using a dictionary we can map the keys to the functions.
def quit_key_action(**params):
    global is_quit
    is_quit = True
def rewind_key_action(**params):
    global frame_counter
    frame_counter = max(0, int(frame_counter - (video_fps * 5)))
    cap.set(cv2.CAP_PROP_POS_FRAMES, frame_counter)
def forward_key_action(**params):
    global frame_counter
    frame_counter = min(int(frame_counter + (video_fps * 5)), no_of_frames - 1)
    cap.set(cv2.CAP_PROP_POS_FRAMES, frame_counter)
def pause_key_action(**params):
    global is_paused
    is_paused = not is_paused
# Map keys to buttons
key_action_dict = {
    ord('q'): quit_key_action,
    ord('a'): rewind_key_action,
    ord('d'): forward_key_action,
    ord('s'): pause_key_action,
    ord(' '): pause_key_action
}
def key_action(_key):
    if _key in key_action_dict:
        key_action_dict[_key]()
Also, we can capture mouse clicks. If the coordinates are inside of our bounding box, we can display information about our objects.
def click_action(event, x, y, flags, param):
    if event == cv2.EVENT_LBUTTONDOWN:
        for item in data_frames[str(frame_counter)]:
                item_id = item['visibleObjectId']
                if frame_counter in data_objects[item_id]:
                    bbox = data_objects[item_id][frame_counter]['rectangle']
                    if bbox[0]['x'] < x < bbox[0]['x']+bbox[0]['w']
                            and bbox[0]['y'] < y < bbox[0]['y']+bbox[0]['h']:
                        print("Info about item:", item)
cv2.setMouseCallback(window_name, click_action)
Finally, we can start our loop and draw boxes on each frame.
prev_time = time.time() # Used to track real fps
frame_counter = 0       # Used to track which frame are we.
is_quit = False         # Used to signal that quit is called
is_paused = False       # Used to signal that pause is called

try:
    while cap.isOpened():
        # If the video is paused, we don't continue reading frames.
        if is_quit:
            # Do something when quiting
            break
        elif is_paused:
            # Do something when paused
            pass
        else:
            ret, frame = cap.read() # Read the frames

            if not ret:
                break

            frame_counter = int(cap.get(cv2.CAP_PROP_POS_FRAMES))
This is the part where we draw bounding box for each object on the frame.
	    # for current frame, check all visible items
            if str(frame_counter) in data_frames:
                for item in data_frames[str(frame_counter)]:
                    item_id = item['visibleObjectId']
                    color = colormap.get_color(item_id)

                    # for visible item, get position at current frame and paint rectangle in
                    if frame_counter in data_objects[item_id]:
                        bbox = data_objects[item_id][frame_counter]['rectangle']
                        x1 = bbox[0]['x']
                        y1 = bbox[0]['y']
                        x2 = x1 + bbox[0]['w']
                        y2 = y1 + bbox[0]['h']
                        cv2.rectangle(frame, (x1, y1), (x2, y2), color, 2)
                        cv2.putText(frame, str(item_id[:3]), (x1, y1-10), font, 0.5, color, 2)
Now we can display fps, frame count, time, or any other information about the video.
	    # Display fps and frame count
            new_time = time.time()
            cv2.putText(frame, 'FPS: %.2f' % (1/(new_time-prev_time)), (10, 20), font, 0.5, [0,250,0], 2)
            prev_time = new_time
            cv2.putText(frame, 'Frame: %d' % (frame_counter), (10, 50), font, 0.5, [0,250,0], 2)
            cv2.putText(frame, 'Time: %f' % (frame_counter/video_fps), (10, 80), font, 0.5, [0,250,0], 2)
At the end of the loop we just display our image and catch any keys pressed.
        # Display the image
        cv2.imshow(window_name,frame)

        # Wait for any key press and pass it to the key action
        key = cv2.waitKey(1)
        key_action(key)
finally:
    cap.release()
    cv2.destroyAllWindows()
Finally, don’t forget to release the video capture and destroy all windows, once the video is over.
Now you are ready to display your videos and use your labels.

Check it out and register your DATAGYM account here – it’s free!
We hope you enjoyed our article. Please contact us if you have any suggestions for future articles or if there are any open questions.
